
Hello everyone, I’m Md Aamir. If you are reading this, you are probably,thinking about how to start a WordPress blog.
Starting a blog was one of the best decisions of my career as a Web Developer. It allows you to share your voice, build a personal brand, and yes—earn passive income.
Many people think starting a blog is technical and difficult. It is not. In 2026, you don’t need to know a single line of code to build a professional website.
In this step-by-step guide, I will hold your hand and walk you through the entire process—from choosing a topic to publishing your first post. By the end of this guide, you will be the proud owner of a beautiful WordPress blog.
Let’s get started!
Choose Your Blog Niche (Topic)
“The first step to start a WordPress blog is not buying a domain; it is deciding what you will write about.”
Many beginners make the mistake of writing about everything—cooking today, travel tomorrow, and politics the next day. Do not do this. If you try to speak to everyone, you end up speaking to no one.
To choose a profitable niche in 2026, ask yourself these three questions:
1. Passion: What am I interested in? (You need to enjoy the topic to write consistently).
2. Knowledge: Do I know more about this than the average person? (You don’t need to be a PhD expert, just helpful).
3. Profitability: Are people spending money in this industry? (e.g., Tech, Health, Finance, and Education are highly profitable).
Pro Tip: Be specific. Instead of a generic “Food Blog,” try “Healthy 15-Minute Meals for Busy Moms.” The more specific you are, the faster you will grow.
Get a Domain Name & Web Hosting
Once you have a topic, you need two things to put your site online:
1. Domain Name: This is your website’s address on the internet (e.g., https://www.google.com/search?q=google.com or webglobaldigitalhub.com).
2.Web Hosting: This is where your website’s files live. Without hosting, no one can see your blog.
Which Hosting Should You Choose?
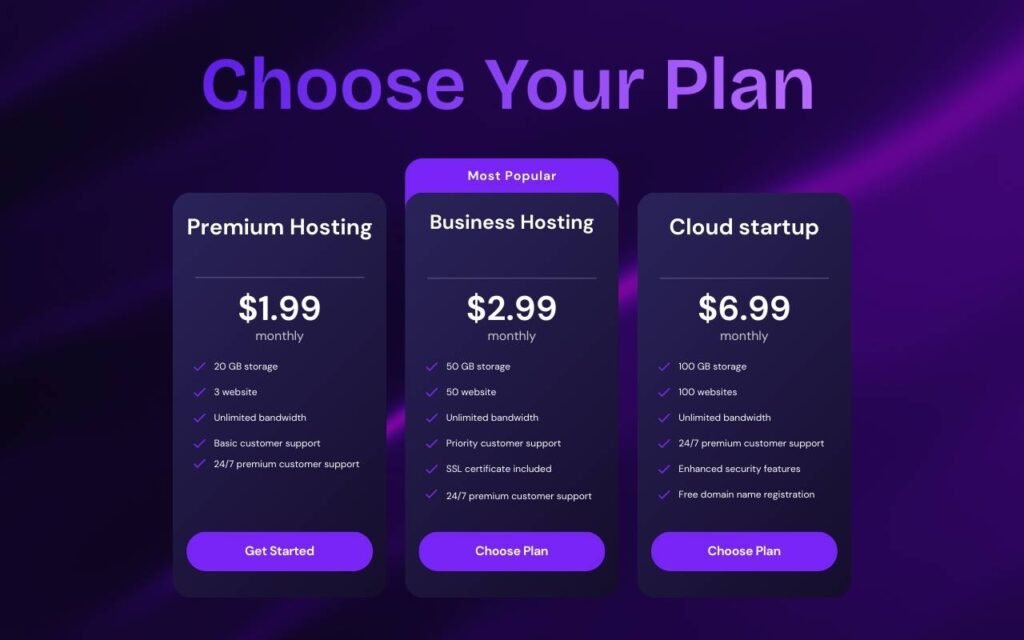
For beginners in 2026, I strongly recommend Hostinger.
Why? Because they offer the best speed for the price. Their “Premium” plan is perfect for starters—it lets you create up to 3 websites, which is more than enough for your first blog. Plus, it usually includes a Free Domain Name for the first year.
How to Claim Your Free Domain Name
“When you sign up for Hostinger (Premium Plan), you get a Domain Name for Free for the first year. This saves you around ₹800-₹1000!
3 Quick Tips for a Best Name:
- Go for .com: It is the most trusted extension.
- Keep it Short: Easy to remember.
- Avoid Numbers: Keep it professional.”
Here is how to get started:
1. Visit the Hostinger Website: Go to their official site to see the latest deals.
2. Choose a Plan: I recommend the “Premium” plan (₹129/mo). It is the most popular choice because it gives you 20GB storage and allows you to host 3 websites.
3.Select Period: Choose the 48-month plan if you want the biggest discount (up to 80% off).
4. Create Account: Enter your email and complete the payment using UPI, Paytm, or Card.
Once you complete the payment, Hostinger will ask you to claim your Free Domain. Type in your desired blog name (e.g., https://www.google.com/search?q=myaamirblog.com) and click “Claim.”
Install WordPress (The Easy Way)
The best part about using Hostinger is that you don’t need to be a coder to install WordPress. It happens with just a few clicks.
1.Log in: Go to your Hostinger Dashboard (hPanel).
2.Find Auto Installer: Look for the “Website” section and click on “Auto Installer.”
3.Select WordPress: You will see WordPress listed there. Click “Select.”
4.Fill Details: Enter your website title (e.g., My Awesome Blog), create an administrator username, and a strong password. Important: Write these down, you will need them to log in!
5.Click Install: Hit the button and wait for 1-2 minutes.
Congratulations! Your website is now live on the internet. You can access your dashboard by visiting:yourdomain.com/wp-admin
Essential Settings for a Pro Blog
Before you write your first post, you need to change 2 settings to make your site Google-friendly.
1. Set Permalinks (Very Important for SEO) By default, WordPress links look ugly (like ?p=123). We want them to look clean.
Go to your WordPress Dashboard.
Navigate to Settings > Permalinks.
Select “Post name” (e.g., yourwebsite.com/sample-post).
2. Install a Fast Theme Your theme
decides how your blog looks. For beginners, I recommend a lightweight and fast theme.
Click “Save Changes.”
Go to Appearance > Themes > Add New.
Search for “Astra” or “GeneratePress”.
Click Install and then Activate.
Write and Publish Your First Post
Now comes the fun part—sharing your voice with the world!
1.Go to your Dashboard and click on Posts > Add New.
2.Add Title: Write a catchy title for your article.
3.Write Content: Use the editor to write your thoughts. You can add images by clicking the + icon.
4.Hit Publish: Once you are happy with your post, click the “Publish” button at the top right corner.
That is it! You have successfully published your first blog post.

Frequently Asked Questions (FAQs)
Q1: Can I start a WordPress blog for free? Technically, yes, you can use WordPress.com for free, but it is very limited. You cannot monetize it, and you don’t own your domain name. To build a professional blog that makes money, you need a self-hosted WordPress site using Hostinger, which costs very little and gives you full control.
Q2: Do I need coding skills to start a blog? No, absolutely not! In 2026, you do not need to know HTML or CSS. WordPress is beginner-friendly. If you can use Facebook or WhatsApp, you can manage a WordPress blog easily.
Q3: How do bloggers make money? There are many ways to earn passive income. The most popular methods are showing ads (AdSense), Affiliate Marketing (promoting products), and Sponsored Posts.
Q4: How often should I publish new posts? Consistency is key. For a new blog, try to publish at least 1 to 2 high-quality articles per week. Google loves fresh content.
Final Thoughts on How to Start a WordPress Blog
Starting a blog is a journey. Do not worry if your first post isn’t perfect. The most important thing is that you started.
If you followed this guide, you now have a professional WordPress blog hosted on Hostinger, which is a great foundation for success.
Now, I want to hear from you: What is the topic of your new blog? Drop a comment below and let me know. I would love to check it out!